

Cihazı kurmak için gerekli olan Wiami Home Technology akıllı telefon uygulamasını aşağıdaki bağlantılara tıkladıktan sonra Google Play Store veya Apple App Store üzerinden yükleyin.

Cihazı kurmak için gerekli olan Wiami Home Technology akıllı telefon uygulamasını aşağıdaki bağlantılara tıkladıktan sonra Google Play Store veya Apple App Store üzerinden yükleyin.
Installation and Use of Robot Vacuum Cleaners
For Models FX-11 Plus, FX-10 and FX-9 Pro
Installation Instructions
1. First of all, position the charging station so that there is 50 cm left and right and 1 meter space in front of it. Do not place the charging station under any objects. If the station is under an object and therefore in the dark, the robot will have difficulty calculating the position of its station.
2. Start the robot by pressing and holding the power button. Then place it in the charging station.
3. After clicking the links below or scanning the QR code, download the Wiami Home Technology smartphone application required to install the device from the Google Play Store or Apple App Store.
Apple App Store App:
https://apps.apple.com/en/app/wiami/id1561396653?l=en
Google Play Store App:
https://play.google.com/store/apps/details?id=wiami.com.android
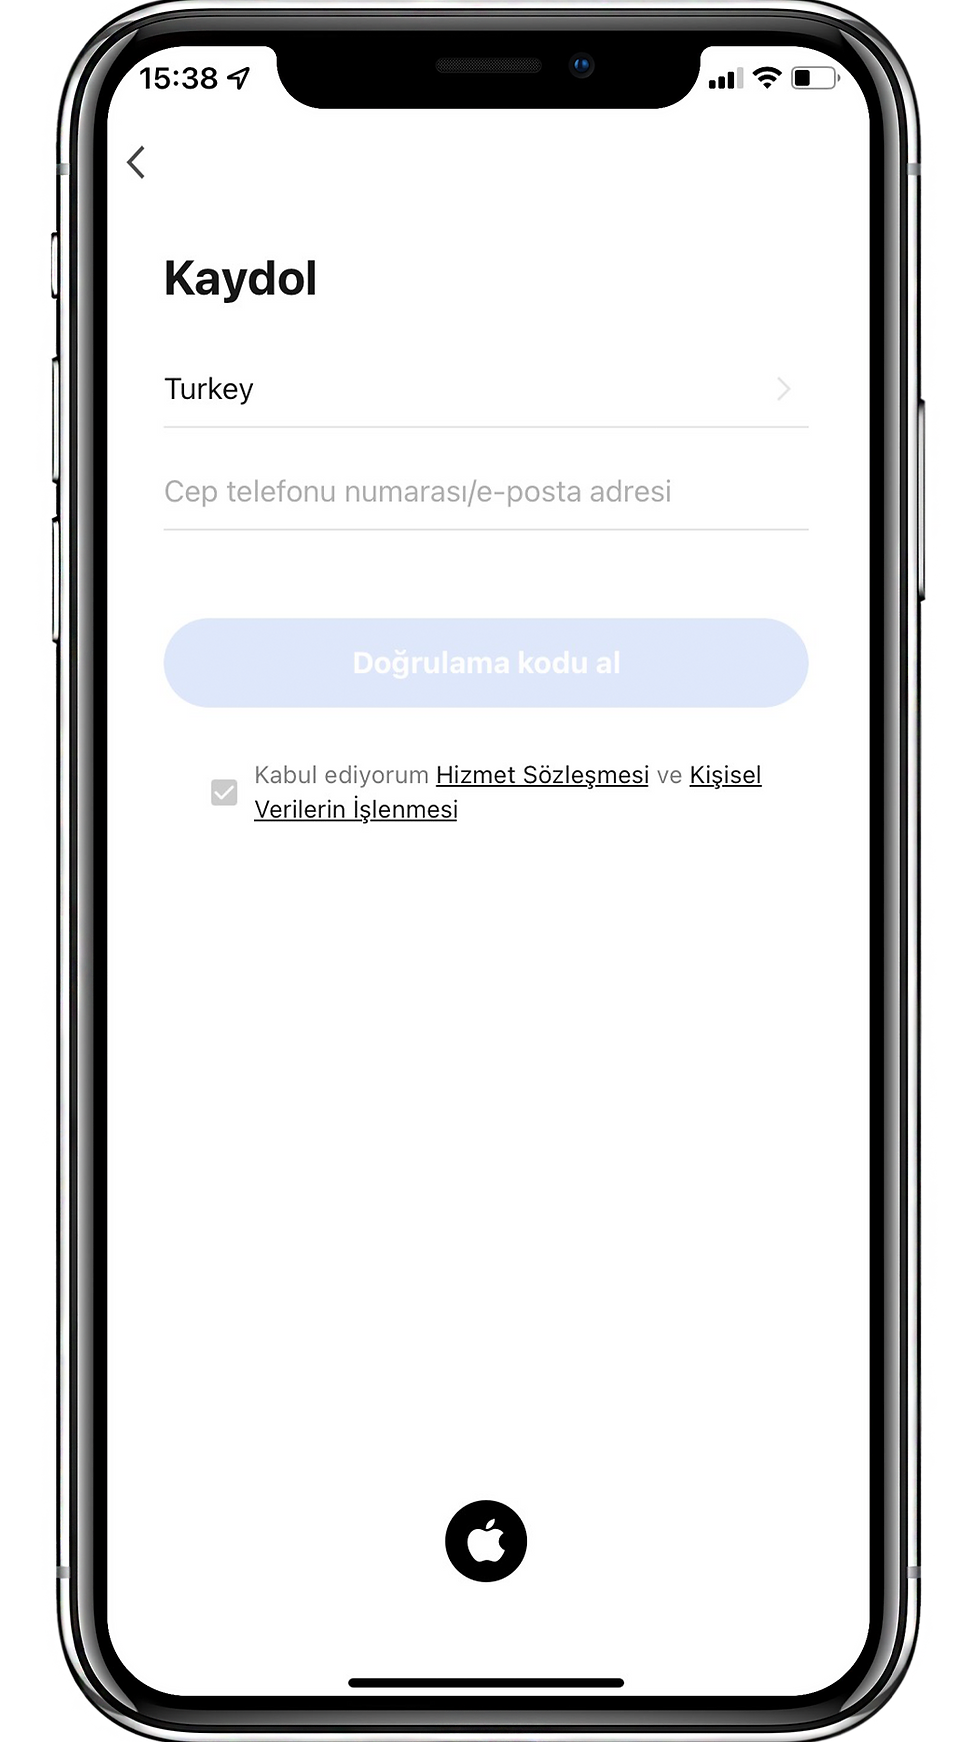
4. Open Wiami Home Technology app and add account. You can create an account using a phone number or e-mail address.
5. After creating an account, you can start adding devices. First, give permission from the Bluetooth access section, and then select your robot model.
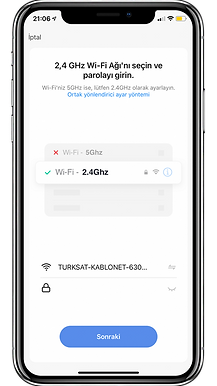
6. Make sure your Wi-Fi connection works in the 2.4 GHz band before starting the device add-on setup via the app. Grant the required location permission. Select the Wi-Fi connection your phone is connected to and enter its password.
7. Press and hold the power button and the clean button for a few seconds until you hear "Wireless connection restored". Once you see the power key flashing, you can proceed to the next step.
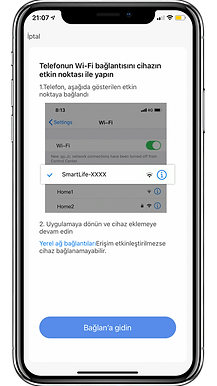
8. In this step, press the "Go to Connect" button to go to the Wi-Fi connection settings to pair your phone with the robot. Click on the link that starts with "SmartLife" and wait for it to connect. After the connection is established, exit the Wi-Fi settings and return to the Wiami Home Technology application. The device pairing process will start automatically. At the end of this process, the device has been successfully added notification will appear.
9. Wait until your robot is fully charged before starting the mapping process. You can view the charge level through the application.
10. After the robot is fully charged, before starting the mapping, make sure that there are no small objects on the floor that may interfere with the robot's operation. The doors of all rooms should be open and not dark. Otherwise, the mapping process may not be completed as desired. For the mapping process, use your robot with the lowest suction.you have to work in the workforce. In this way, you can ensure that the mapping process is not left unfinished due to low battery. After choosing the lowest suction power, you can start the mapping by pressing the "start" button from the application. You should not stop the program until the robot has finished mapping and returned to the station.
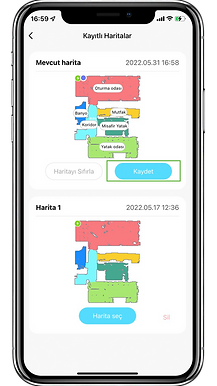
11. After the mapping is finished and the robot returns to the station, go to the "More" section on the application, select "Saved Maps" and save the current map.
12. After saving the map, the rooms will automatically take on different colors. From this point on, you can use functions such as adding virtual walls, cleaning rooms or cleaning areas.
13. In order for your robot to operate at its intended efficiency, it must be regularly maintained. The parts to be maintained and their duration are as follows:
14. Only water should be added to the water tank of the robot. The use of chemicals should be avoided. Substances such as vinegar, detergent, bleach may damage the water tank and the device and void the warranty.
15. You can benefit from new functions if you follow the updates to the application and your robot and ensure that your device is in the latest version.


Parça | Temizlik Frekansı | Değiştirme Frekansı |
|---|---|---|
Ana Fırça | Haftada 1 Defa | 6-12 Ayda 1 Defa |
Yan Fırça | Haftada 1 Defa | 3-6 Ayda 1 Defa |
HEPA Filtre | Haftada 1 Defa | 3-6 Ayda 1 Defa |
Toz Haznesi | Her Kullanımdan Sonra | Arıza Durumunda |
Ana Tekerlek | Ayda 1 Defa | Arıza Durumunda |
Şarj Elektrotları | Haftada 1 Defa | Arıza Durumunda |
Toz Torbası (FX-11) | - | 2-3 Ayda 1 Defa |
For Models FX-8 and FX-7
Installation Instructions
1. First of all, position the charging station so that there is 50 cm left and right and 1 meter space in front of it. Do not place the charging station under any objects. If the station is under an object and therefore in the dark, the robot will have difficulty calculating the position of its station.
2. Place the robot in the charging station.
3. You can use the device without installing the Wiami Home Technology smartphone app. In order to use the device, you must first press the on/off button under it. Then place the robot on the charging station. After the device is fully charged, you can start cleaning by pressing the start button on the remote. The full charge time is 4 and a half hours.
4. If you want to install the application, after clicking the links below or scanning the QR code, download it from the Google Play Store or Apple App Store. If you install the application, you can use all the functions on the remote from your phone and in addition to these, you can view the charge level. You can also activate the updates that will come to your device through the application.
Apple App Store App:
https://apps.apple.com/en/app/wiami/id1561396653?l=en
Google Play Store App:
https://play.google.com/store/apps/details?id=wiami.com.android
5. Open Wiami Home Technology app and add account. You can create an account using a phone number or e-mail address.
6. After creating an account, you can start adding devices. First, give permission from the Bluetooth access section, and then select your robot model.
7. Before starting the device add-on setup via the app, make sure your Wi-Fi connection works in the 2.4 GHz band. Grant the required location permission. Select the Wi-Fi connection your phone is connected to and enter its password.
8. Press and hold the power button and the clean button for a few seconds. Once you see the power key flashing, you can proceed to the next step.
9. In this step, press the "Go to Connect" button to go to the Wi-Fi connection settings to pair the robot with your phone. Click on the link that starts with "SmartLife" and wait for it to connect. After the connection is established, exit the Wi-Fi settings and return to the Wiami Home Technology application. The device pairing process will start automatically. At the end of this process, the device has been successfully added notification will appear.
10. In order for your robot to operate at its intended efficiency, it must be regularly maintained. The parts to be maintained and their duration are as follows.
11. Only water should be added to the water tank of the robot. The use of chemicals should be avoided. Substances such as vinegar, detergent, bleach may damage the water tank and the device and void the warranty.
12. You can take advantage of new functions if you follow the updates to the application and your robot and ensure that your device is in the latest version.


Parça | Temizlik Frekansı | Değiştirme Frekansı |
|---|---|---|
Ana Fırça | Haftada 1 Defa | 6-12 Ayda 1 Defa |
Yan Fırça | Haftada 1 Defa | 3-6 Ayda 1 Defa |
HEPA Filtre | Haftada 1 Defa | 3-6 Ayda 1 Defa |
Toz Haznesi | Her Kullanımdan Sonra | Arıza Durumunda |
Ana Tekerlek | Ayda 1 Defa | Arıza Durumunda |
Şarj Elektrotları | Haftada 1 Defa | Arıza Durumunda |
Toz Torbası (FX-11) | - | 2-3 Ayda 1 Defa |
